교차검증의 필요성
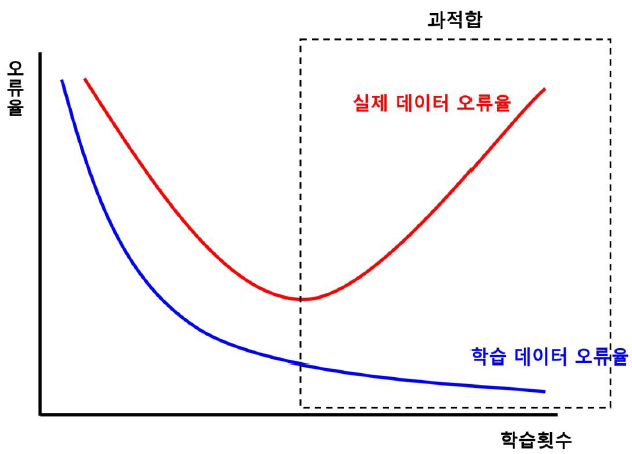
- 고정된 학습 데이터와 테스트 데이터로 평가를 하다보면 학습 데이터에만 최적의 성능을 발휘할 수 있도록 편향된 모델을 유도하는 경향이 생김
- 이 경우 모델이 학습 데이터에만 과도하게 최적화되어 실제 예측을 다른 데이터로 수행할 경우에는 예측 성능이 과도하게 떨어짐
- 이러한 과적합을 피하기 위해 '교차 검증'이 필요

- 과적합을 피하기 위해서 훈련 데이터 세트 전체를 한 번에 훈련시키지 않고, 일부를 남겨두고 테스트하는 방법
- 데이터에 의한 편향을 막기 위해서 별도의 여러 세트로 구성된 학습 데이터와 검증 데이터를 통해 학습과 평가를 수행
- 모델 성능 평가의 목적 달성에 좋은 방법
** 모델 성능 평가의 목적: Unseen Data에 대한 성능 예측(Better Forecasting) 및 더 좋은 모델을 선택하기 위함(Hyperparameter Tuning)
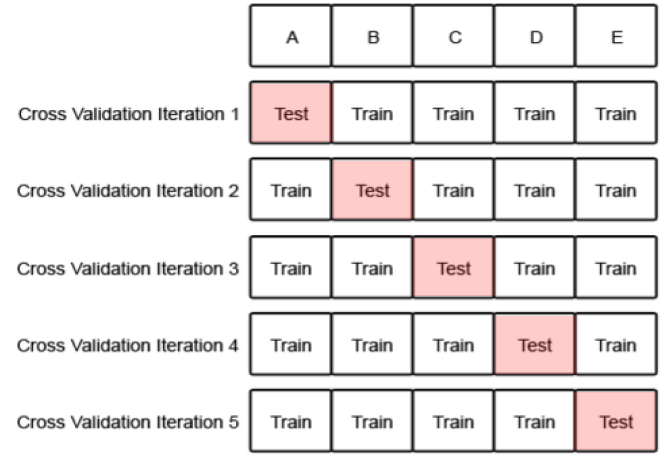
K-Fold 교차검증
- 가장 기본적인 교차 검증의 구성
- 모든 데이터가 최소 한 번은 테스트 셋에 쓰이도록 iteration 구성
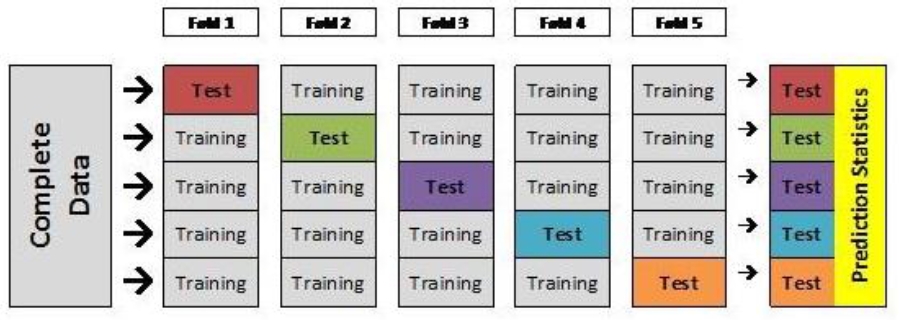
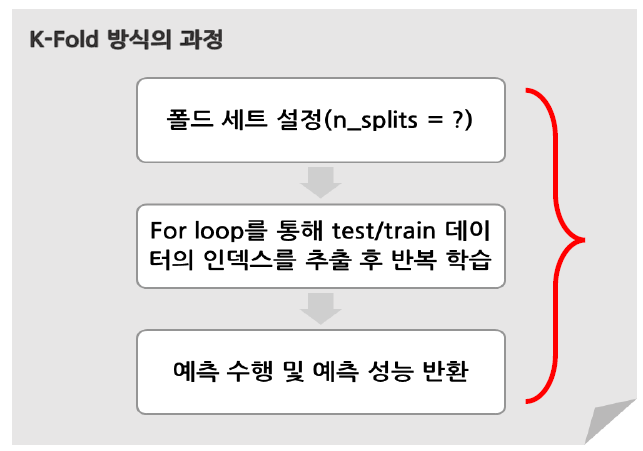
K-Fold 교차검증 과정
- 전체 데이터를 K개의 그룹으로 나눈다.
- 하나는 test dataset, 나머지는 train dataset으로 사용해 성능을 구한다.
- K개의 test dataset이 존재하게 되므로, 2)의 과정을 K번 반복한다.
- 매 시기마다의 성능 평균을 도출하면, 이것이 머신러닝 모델의 최종 성능 지표가 된다.

K-Fold 교차검증의 특징
- 모든 데이터가 한 번씩은 test data로 쓰인다.
- 여러 번 반복하기 때문에 성능을 정확히 구할 수 있다.
- K번 반복하기 때문에 정확도 향상을 위해 K를 늘릴 수록 시간과 메모리 사용량이 매우 늘어난다.
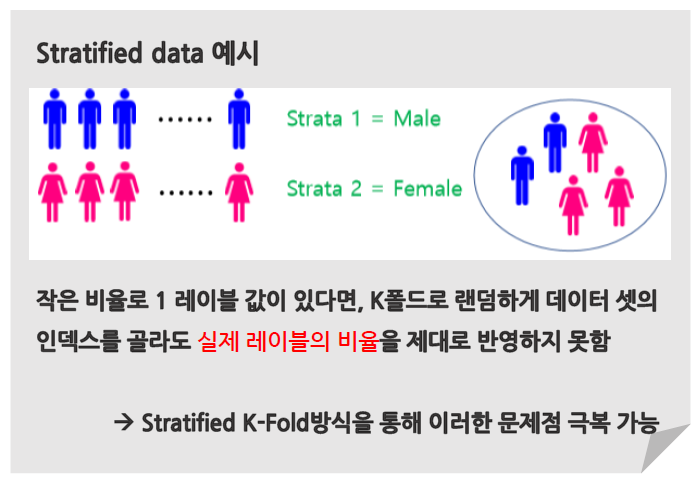
- 데이터 셋에 레이블이 불균등하게 편향되어 있을 경우, 교차 검증 시도 별로 실제 데이터의 분포를 반영하지 못한 결과를 도출할 가능성이 생긴다. ⇒ 문제점
K-Fold 교차검증 연습
from sklearn.tree import DecisionTreeClassifier
from sklearn.metrics import accuracy_score
from sklearn.model_selection import KFold
import numpy as np

iris = load_iris()
features = iris.data
label = iris.target
dt_clf = DecisionTreeClassifier(random_state=156)


# 5개의 폴드 세트로 분리하는 KFold 객체와 폴드 세트별 정확도를 담을 리스트 객체 생성

kfold = KFold(n_splits=5)
cv_accuracy = []

print('붓꽃 데이터 세트 크기: ', features.shape[0])
features.shape
# 데이터 확인
iris.keys()
iris.feature_names
iris.target # 0은 setosa, 1은 versicolor, 2는 virginica
iris.target_names
n_iter=0

for train_index, test_index in kfold.split(features):
    # kfold.split()으로 반환된 인덱스를 활용하여 train용, test용 데이터 추출
    x_train, x_test = features[train_index], features[test_index]
    y_train, y_test = label[train_index], label[test_index]

    # 학습 및 예측
    dt_clf.fit(x_train, y_train)
    pred = dt_clf.predict(x_test)
    n_iter +=1

    # 반복할 때마다 정확도 측정
    accuracy = np.round(accuracy_score(y_test, pred), 4)
    train_size = x_train.shape[0]
    test_size = x_test.shape[0]
    print("\n#{0} 교차 검증 정확도: {1}, 학습 데이터 크기: {2}, 검증 데이터 크기: {3}".format(n_iter, accuracy, train_size, test_size))
    print("#{0} 검증 세트 인덱스: {1}".format(n_iter, test_index))
    cv_accuracy.append(accuracy)


# 각 iteration 별 정확도를 합하여 평균 정확도 계산
print('\n## 평균 검증 정확도: ', np.mean(cv_accuracy))
- 모든 데이터가 한 번씩 사용됨을 알 수 있음
- 총 150개의 데이터를 5개로 나눔. 따라서 검증 데이터의 크기는 30개
Stratified K-Fold 교차검증
- 불균형한(imbalanced) 분포도를 가진 레이블 데이터를 위한 K-Fold 방식
- 불균형한 분포도를 가진 레이블 데이터 집합이란?
: 특정 레이블 값이 너무 많거나 적어서 값의 분포가 한 쪽으로 치우친 데이터 셋 - 사이킷 런의 Stratified K-Fold 클래스 이용
Stratified K-Fold 교차검증 연습
# iris 데이터로 Stratified K-Fold 이해하기

import pandas as pd
iris_df = pd.DataFrame(data=iris.data, columns=iris.feature_names)
iris_df['label'] = iris.target
iris_df['label'].value_counts()
- 레이블 값은 0,1,2 모두 50개로 동일함
# 참고
iris_df
<Iris data set에 K-Fold 적용해보기>
kfold = KFold(n_splits=3)
n_iter = 0
for train_index, test_index in kfold.split(iris_df):
    n_iter += 1
    label_train = iris_df['label'].iloc[train_index]
    label_test = iris_df['label'].iloc[test_index]
    print('## 교차 검증: {0}'.format(n_iter))
    print('학습 레이블 데이터 분포 : \n', label_train.value_counts())
    print('검증 레이블 데이터 분포: \n', label_test.value_counts())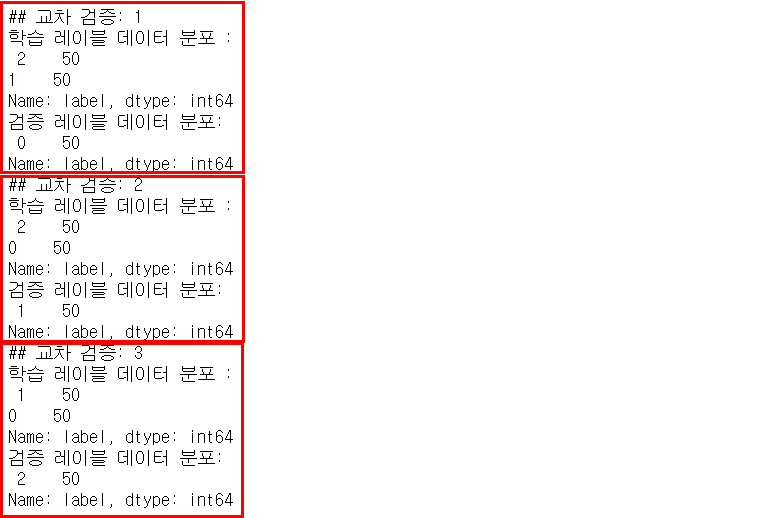
- 문제가 발생하는 현상을 도출하기 위해 3개의 폴드 세트를 KFold로 생성하고, 각 교차 검증 시마다 생성되는 학습/검증 레이블 데이터 값의 분포도 확인
- 이렇게 진행하면 학습/검증 레이블이 전혀 다른 데이터를 포함하고 있어서 각각의 교차 검증 시기마다의 정확도=0
- 즉, 데이터가 불균형한 분포를 띌 때 그냥 K-Fold를 진행하면 예측 정확도는 0이 될 수밖에 없음!
from sklearn.model_selection import StratifiedKFold

skf = StratifiedKFold(n_splits=3)
n_iter=0

for train_index, test_index in skf.split(iris_df, iris_df['label']):
    n_iter += 1
    label_train = iris_df['label'].iloc[train_index]
    label_test = iris_df['label'].iloc[test_index]
    print('## 교차 검증: {0}'.format(n_iter))
    print('학습 레이블 데이터 분포: \n', label_train.value_counts())
    print('검증 레이블 데이터 분포: \n', label_test.value_counts())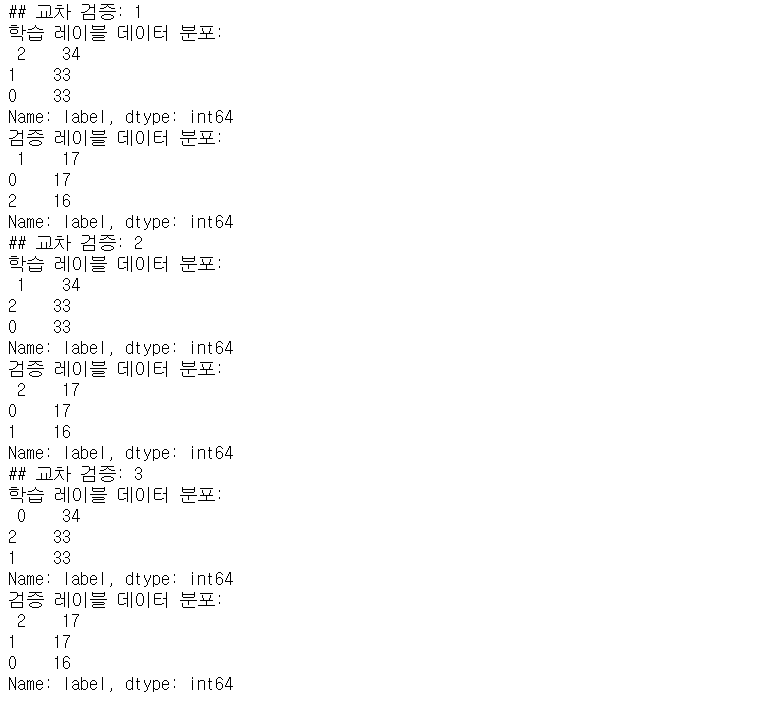
[앞서 진행한 K-Fold 방식과의 차이점]
- split() 메서드를 통해 분리할 때, argument로 피처 데이터 세트뿐만 아니라 레이블 데이터 세트도 반드시 넘겨줘야 함→ K-Fold의 경우 split() 레이블 데이터의 인자를 입력하지 않아도 됨
→ 데이터 피처의 분포를 고려하여 test/train dataset을 분리하기 때문 - 모든 label이 적절한 비율로 train dataset과 test dataset에 담겼음을 확인할 수 있음
<Stratified K-Fold로 교차 검증 수행>
# Stratified K-Fold를 이용한 iris 데이터 교차검증 하기

dt_clf = DecisionTreeClassifier(random_state=156)

skfold = StratifiedKFold(n_splits=3)
n_iter=0
cv_accuracy=[]

# Stratified K-Fold의 splot() 호출시 반드시 레이블 데이터 셋도 추가 입력
for train_index, test_index in skfold.split(features, label):
    x_train, x_test = features[train_index], features[test_index]
    y_train, y_test = label[train_index], label[test_index]

    # 학습 및 예측
    dt_clf.fit(x_train, y_train)
    pred = dt_clf.predict(x_test)

    # 반복 시마다 정확도 측정
    n_iter += 1
    accuracy = np.round(accuracy_score(y_test, pred), 4)
    train_size = x_train.shape[0]
    test_size = x_test.shape[0]
    print('\n{0} 교차검증 정확도: {1}, 학습 데이터 크기: {2}, 검증 데이터 크기: {3}'.format(n_iter, accuracy, train_size, test_size))
    print('#{0} 검증 세트 인덱스: {1}'.format(n_iter, test_index))
    cv_accuracy.append(accuracy)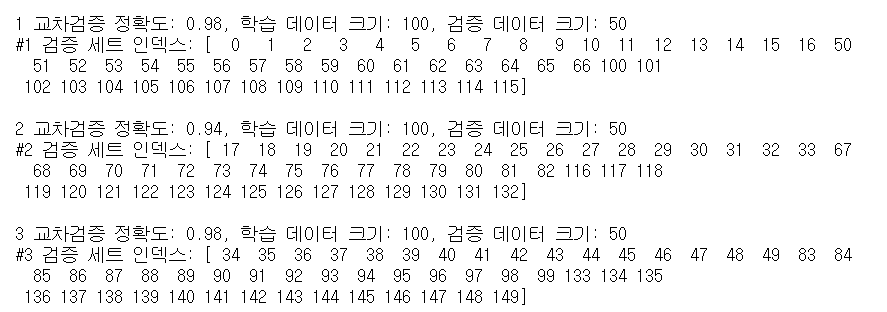
<Stratified K-Fold로 수행한 교차 검증의 정확도>
from sklearn.tree import DecisionTreeClassifier
from sklearn.model_selection import cross_val_score, cross_validate
from sklearn.datasets import load_iris

iris_data = load_iris()
dt_clf = DecisionTreeClassifier(random_state=156)

data = iris_data.data
label = iris_data.target

# 성능 지표는 정확도(accuracy), 교차 검증 세트는 3개
scores = cross_val_score(dt_clf, data, label, scoring='accuracy', cv=3)
print('교차 검증별 정확도: ', np.round(scores, 4))
print('평균 검증 정확도: ', np.round(np.mean(scores), 4))
Stratified K-Fold 교차검증 정리
- 왜곡된 분포를 가진 데이터 셋뿐만 아니라, 일반적인 분류의 경우에서도 우리의 눈으로 관측 불가능한 이상치 등이 존재할 수 있으므로 일반 K-Fold 방식이 아니라 Stratified K-Fold 방식을 활용하는 것이 좋음
- 주의할 점: 지금까지 다룬 것은 분류(Classification)의 문제, 회귀(Regression)에서는 Stratified K-Fold 방식이 지원되지 않음
- Why? 회귀의 결과값은 이산 값 형태의 레이블이 아니라 연속된 숫자 값이기 때문!
cross_val_score()
- 교차검증을 보다 간편하게 하는 방법
- K-Fold에서 거치는 과정을 한 번에 수행해주는 API
⇒ 이러한 일련의 과정을 한 번에 수행 가능!
cross_val_score() 예제
# MLP for Pima indians Dataset with 10-fold cross validation via sklearn
from keras.models import Sequential
from keras.layers import Dense
from keras.wrappers.scikit_learn import KerasClassifier
from sklearn.model_selection import KFold
from sklearn.model_selection import cross_val_score
import numpy

# Function to create model.required for KerasClassifier
def create_model():
    # create model
    model = Sequential()
    model.add(Dense(4, input_dim=8, activation='relu'))
    model.add(Dense(4, activation='relu'))
    model.add(Dense(1, activation='sigmoid'))
    # Compile model
    model.compile(loss='binary_crossentropy', optimizer='adam', metrics=['accuracy'])
    return model

# fix random seed for reproducibility
seed = 7
numpy.random.seed(seed)

# load pima indians dataset
dataset = numpy.loadtxt('pima-indians-diabetes.data.csv', delimiter=',')

# split into input (X) and output (Y) variables
X = dataset[:,0:8]
Y = dataset[:,8]

# create model
model = KerasClassifier(build_fn = create_model, epochs=150, batch_size=10, verbose=0)

kfold = KFold(n_splits=2, shuffle=True, random_state=seed)
results = cross_val_score(model, X, Y, cv=kfold)
results
- create_model()을 통해 Keras Model 객체를 얻는다.
- KerasClassifier Wrapper를 통해 Keras Model을 Scikit learn에서 사용할 수 있는 객체로 변환을 한다.
- Scikit-learn의 KFold를 통해 Kfold의 Rule을 지정한다.
- cross_val_score()를 통해 해당 모델의 cross validation score를 계산한다.
'Python > 머신러닝' 카테고리의 다른 글
| 머신러닝 디시전트리 파라미터 (0) | 2022.05.12 |
|---|---|
| 머신러닝 디시전트리 모델의 특징 (0) | 2022.05.03 |
| 머신러닝 분류 (0) | 2022.05.03 |
| 머신러닝 하이퍼파라미터 튜닝(GridSearch, RandomSearch) (0) | 2022.04.30 |
| 머신러닝 개요 (0) | 2022.04.23 |